
Quick Answer
A dollar store kitchen can look tidy when the containers match, the labels match, and each group has one clear home. Pick one shelf or one drawer, group items by task, and use clear bins, matching jars, risers, and no-drill hooks to give each group a visible spot.
Keep the color palette to two or three soft tones, and leave a little space on each shelf so the result reads as calm rather than crowded.
Contents
- Matching Clear Bins for One Shelf at a Time
- Matching Jars and Plain Labels for Dry Goods
- Shelf Risers for Tall Cabinets
- A Turntable for Deep Cabinets
- Small Trays for One Drawer
- A Tension Rod Under the Sink
- An Over-Door Rack for Foil, Plastic Wrap and Lids
- Adhesive Hooks Inside a Cabinet Door
- Magazine Holders on Their Side for Bottles and Cans
- Labeled Baskets by Task
- A Sink Caddy for Cleaning Supplies
- A Counter Tray That Holds the Daily Items
- Before You Shop: A Short Plan
- What Makes Dollar Store Finds Look Good
- Shopping List
- FAQ
1. Matching Clear Bins for One Shelf at a Time
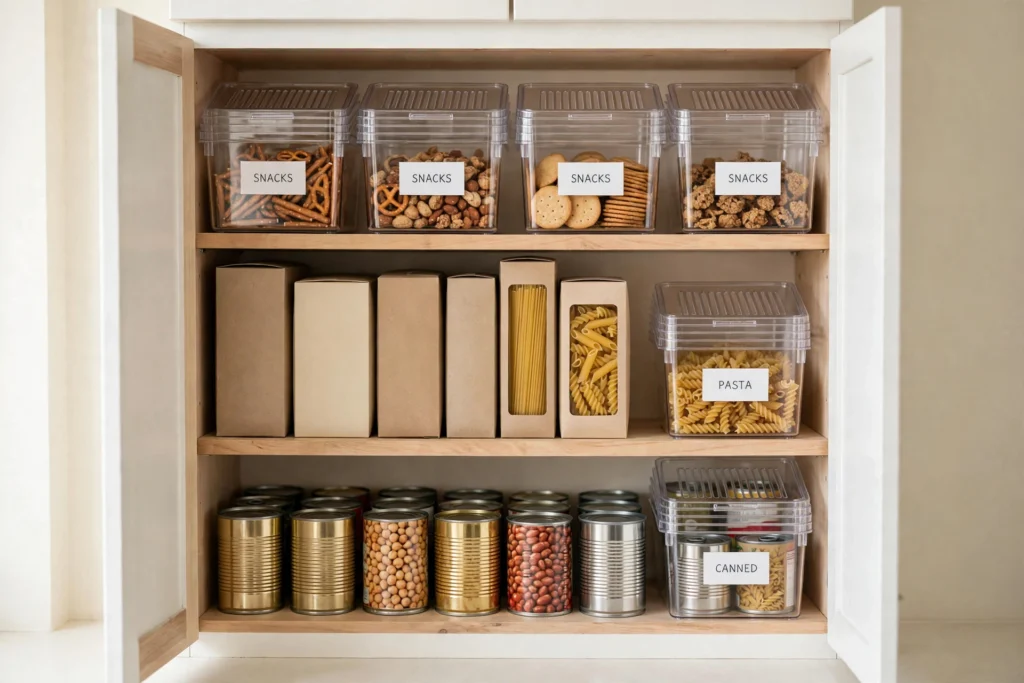
Clear bins are the workhorse of dollar store organization. Use them to group snacks, pasta boxes, sauce packets, or canned goods on one shelf. Because the bin is clear, the contents stay visible, and because the bin has sides, a group can slide out as one unit instead of moving item by item.
Keep the bins to one style and one size for a single shelf. Fill each bin loosely, with a little room at the top, so items can be lifted out without pulling the bin apart. A bin that is packed tight can look messy even when the items inside are sorted, while a bin with a little room at the top looks tidy.
Place the bin so its short side faces out when the shelf is deep, and label the front with one plain word, such as snacks, pasta, or sauces. The label turns a plastic bin into a system that other people in the home can follow without asking where things live.
2. Matching Jars and Plain Labels for Dry Goods
Glass jars can change the look of an open shelf a lot. Move flour, sugar, pasta, rice, oats, or cereal into matching jars, and the shelf shifts from a row of torn boxes to a row of calm, repeated shapes. Use jars of the same height for one shelf, so the line across the top stays level.
Plain labels finish the look. Write one word per jar in the same style, in the same spot on each jar. Chalk-style labels, plain white labels, or kraft labels all work, as long as the set matches. Avoid mixing label styles on one shelf, because mixed labels pull the eye in different directions and undo the calm the matching jars created.
Keep loose dry goods in jars with lids that close well, and keep the original cooking directions and the best-by date somewhere handy when a jar replaces a box, such as a small note inside a drawer or a photo on a phone. This keeps the shelf tidy without losing the information that came on the package.
3. Shelf Risers for Tall Cabinets
Tall cabinet shelves waste the space above short items. A wire shelf riser adds a second level inside the cabinet, so plates, bowls, mugs, or canned goods can sit on two levels instead of one. The riser needs no tools, it sits on the shelf, and it lifts easily out for cleaning.
Measure the shelf height before buying. The riser must leave room for the tallest item on the lower level, plus room to lift that item out. A riser that fits the shelf but leaves too little room for a tall bottle underneath is no help, so check the height with the bottle in place, not with the shelf empty.
Use risers for one group per shelf, such as canned goods or mugs, rather than mixing many groups on one riser. One group per level keeps the cabinet readable at a glance, and it keeps the lower level from turning into a hiding spot for items that belong elsewhere. Shelf risers also feature in our guide to kitchen storage ideas for small apartments with no pantry.
4. A Turntable for Deep Cabinets
Deep cabinets hide jars at the back. A turntable, sometimes called a lazy Susan, brings the back of the cabinet forward with a spin. Use it for oils, sauces, spices, or condiments, and group the items on it by task, so cooking oils sit together and sauces sit together.
Keep the turntable to one group when the cabinet is small. A turntable crowded with many groups spins into a tangle, while a turntable holding one group spins cleanly and puts each jar within reach. Wipe the turntable when spills happen, because a sticky turntable spins less smoothly and the group behind it gets ignored.
Turntables also help in a fridge, where a small turntable can hold condiments or dressings in one visible group. Check the turntable size against the fridge shelf before buying, and keep tall bottles off a turntable that sits under a low shelf. Our guide to kitchen storage ideas for small apartments with no pantry has more ideas for deep cabinets and small spaces.
5. Small Trays for One Drawer
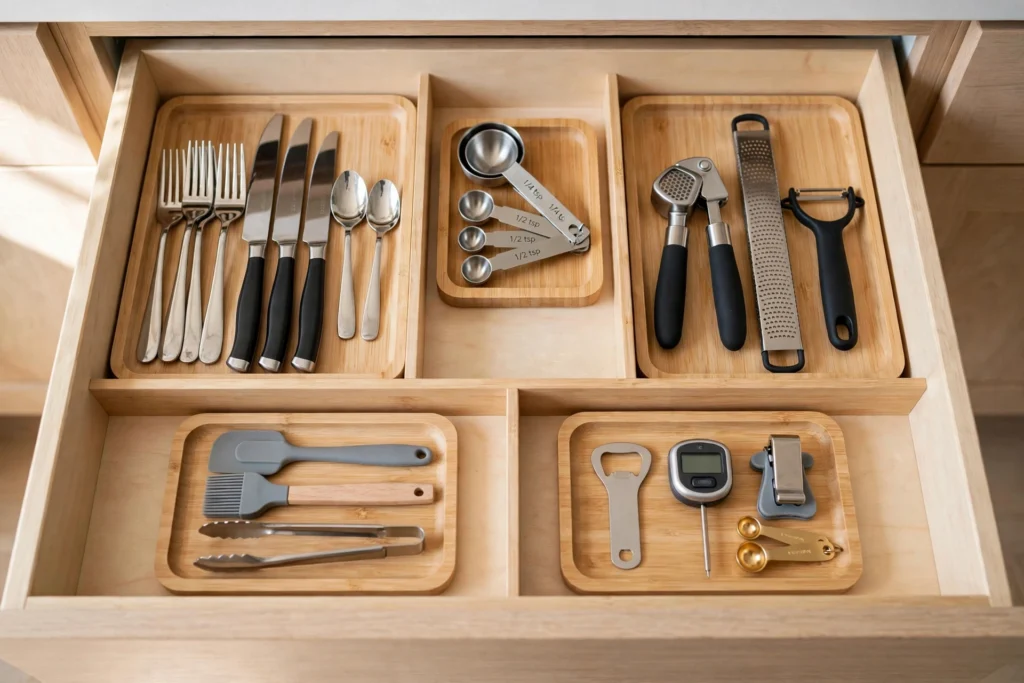
A junk drawer and a silverware drawer share the same problem: loose items slide around and pile up. Small dollar store trays fix this by splitting one drawer into lanes. Silverware goes in one lane, measuring spoons in another, and small cooking tools in a third.
Line the drawer first, then set the trays in place and test the layout with the drawer sliding open and closed. Trays that shift when the drawer moves can be steadied with a non-slip liner under the tray (mounting tape also works, but it can leave residue). The goal is a drawer that opens to the same layout each time, so putting items away takes less thought.
6. A Tension Rod Under the Sink
The space under the sink fills up fast, with pipes taking room and cleaning sprays crowding the floor. A tension rod across the top of the cabinet, where the pipes leave room, hangs spray bottles by their triggers (check the rod’s weight limit first) and frees the floor for larger items such as a bin of cleaning cloths or a box of trash bags.
A tension rod doesn’t require drilling. Twist it to length, wedge it between the cabinet walls, and hang the bottles. Check that the rod sits clear of the pipes and that the cabinet door still closes with the bottles hanging, because a rod placed too close to the door can block it.
Keep food out of the under-sink cabinet. Cleaning supplies and food do not belong in the same small space, and a clear rule here keeps the rest of the system simple: under the sink is for cleaning, and food lives in the food zone. If children or pets share the home, keep cleaning products in a closed bin out of their reach, and keep shutoff valves easy to reach.
7. An Over-Door Rack for Foil, Plastic Wrap and Lids
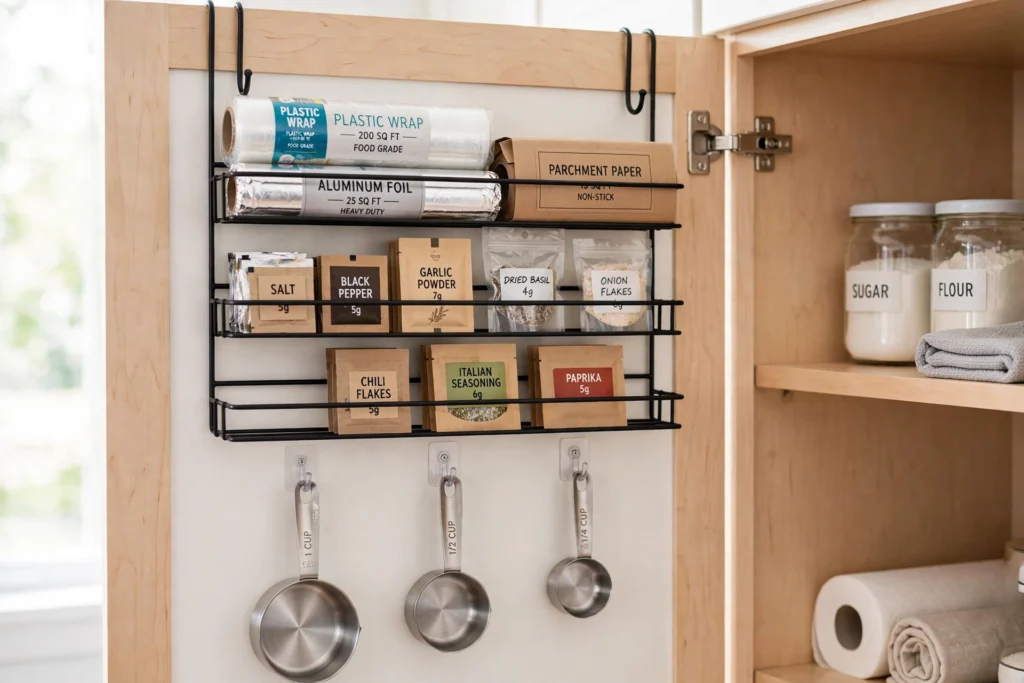
Cabinet doors hold useful space that often goes unused. An over-door rack hooks over the door and holds foil, plastic wrap, parchment paper, or pot lids in vertical slots. The rack doesn’t require drilling, and it moves with the door, so the items inside stay close to the prep counter.
Check the door thickness and the rack hook before buying, and check that the door still closes with the rack in place. Some cabinet doors are thick, and some racks sit proud of the door, so a quick test in the store aisle, or a measurement at home, saves a return trip.
Keep the rack to light items. Foil, plastic wrap, lids, and thin cutting boards suit a door rack. Heavy pots and full bottles do not, because weight on a door can strain the hinges over time and can make the door swing awkwardly. For more ways to use cabinet doors in a small kitchen, see our guide to kitchen storage ideas for small apartments with no pantry.
8. Adhesive Hooks Inside a Cabinet Door
Adhesive hooks inside a cabinet door hold measuring cups, small utensils, or a pair of kitchen scissors where they can be seen at a glance. Stick the hook to a clean, dry surface, press it firmly, and follow the packaging’s wait time before hanging anything.
Test one hook first. Hang a light item on it for a day, and check that the hook holds and that the door closes. When the first hook holds well, add a second hook for the next item, rather than covering the door with hooks at once. Two or three hooks per door is enough; more can block the items stored on the shelf behind it.
For renters, adhesive hooks avoid screw holes, but removal can still pull off paint or cabinet finish. Follow the packaging’s cleaning, wait-time, and weight-limit instructions, test one on a hidden spot, and ask your landlord if you’re unsure.
9. Magazine Holders on Their Side for Bottles and Cans
Magazine holders, or book bins, from the dollar store make a tidy home for water bottles, canned goods, or foil rolls when turned on their side. Lay the holder down with its opening facing out, slide bottles or cans in, and stack two or three holders side by side on a shelf. The holder keeps the group upright and keeps bottles from rolling.
This idea suits a cabinet with a deep shelf, where bottles tend to roll to the back and get forgotten. With holders on their side, each group stays in its lane, and pulling a bottle out does not disturb the group beside it.
Label the end of each holder with the group name, such as water, cans, or foil, so the shelf reads clearly from the front. When a holder style is out of stock, pick a new style for the whole shelf, so the row stays matched.
10. Labeled Baskets by Task
Baskets group items that do not need to be seen, such as baking supplies, snack packets, or cleaning cloths. A basket with a label turns a jumble into a task group, and a row of baskets in the same color turns a shelf into a tidy block of color rather than a patchwork.
Pick one basket color for one shelf, and keep the labels in one style. Natural woven baskets suit a warm kitchen, while white or gray plastic baskets suit a cooler kitchen. The color matters less than the match: one color, repeated, looks intentional.
Store one task per basket. Baking supplies in one basket, snacks in another, and small household items in a third, kept out of the food area. When a basket starts to overflow, it is a sign that the group has grown too large for its shelf, and part of the group should move to another spot rather than stacking higher.
11. A Sink Caddy for Cleaning Supplies
A small caddy beside the sink holds dish soap, a sponge, and a scrub brush in one portable group. A shower caddy or a small plastic caddy from the dollar store works here, and the caddy can be lifted out for cleaning the sink area without moving each item separately.
Keep the caddy to the items used at the sink. Soap, sponge, brush, and a small bottle of cleaner are enough. When the caddy holds items from other rooms, it turns into a second junk drawer, so move stray items back to their own groups.
A cake stand made from a dollar store plate and candlestick (glued with a strong waterproof adhesive) can serve the same role with a tidier look: soap and sponge sit on the raised plate, which keeps them off the counter, and the small stand reads as a deliberate detail rather than a pile beside the faucet. Wipe the plate dry so water doesn’t pool.
12. A Counter Tray That Holds the Daily Items
Counters stay tidy when daily items have a tray. A small tray, a basket, or a cutting-board base holds salt, pepper, and a wooden spoon in one group near the stove (keep cooking oil out of direct stove heat), so the items used at each meal do not spread across the counter between meals.
Keep the tray small. A tray that holds four or five daily items looks tidy. A tray that holds a dozen items looks like a second shelf on the counter, and items on it start to become clutter. When a new item joins the tray, move an item that is used less often back to its cabinet group.
A tray also helps at the coffee station or the tea corner. Mugs, a jar of coffee or tea, and a small spoon sit on one tray, and the rest of the counter stays clear for prep work. This is one of the simplest dollar store ideas, and it works because it gives the busiest items a boundary.
Before You Shop: A Short Plan
Dollar store organization often goes wrong: a cart full of mismatched bins comes home, the bins do not fit the shelf, and the kitchen looks busier than before. A short plan prevents that.
Pick one spot first, such as the shelf that holds snacks, or the drawer that holds silverware. Empty that spot, group the items that live there, and measure the width, depth, and height of the space. Write the numbers down and take the note to the store.
At the store, shop by group, not by aisle. If the shelf holds snacks, buy bins for snacks. If the drawer holds silverware, buy trays for silverware. This keeps the project small, and it keeps the result consistent, because the containers bought for one spot tend to match each other.
Price is part of the plan, too. Prices vary by store and item, so check the shelf tag for each item and add up your list before checkout. A small project with six or seven items costs little, and the money saved can go toward labels or a second shelf later.
One more habit helps: buy the same style twice rather than two different styles once. Two matching bins on a shelf look intentional.
Two different bins look like leftovers. When the store has only one of a style, wait for a restock or pick a different style that the store stocks in depth, so the shelf can stay matched over time. Stock varies by store, so a style you see today may not be there next week.
What Makes Dollar Store Finds Look Good
Three habits help a tidy dollar store kitchen. First, match the containers on each shelf, in style and in color, so the shelf reads as one system. Second, label in one style, with one word per container, so each group can be found and put back without guessing. Third, leave a little space: a shelf that is three-quarters full looks calmer than a shelf packed edge to edge, and a group with room to grow stays tidy longer than a group that is already overflowing.
Screw-in racks and rails can look good too, and they typically hold more weight than adhesive or over-door options. In a rental, check the lease first before choosing a screw-in version, and ask the landlord when the lease is unclear. Checking your lease first helps you avoid surprises with your deposit.
For a full method on setting zones before buying containers, see How to Organize Kitchen Cabinets in a Tiny Kitchen (Step by Step).
Shopping List
Items are listed by type only, so they can be matched to measured shelves:
- Clear bins, one style per shelf
- Matching glass jars with lids
- Plain labels and a marker
- Wire shelf risers
- Turntables
- Small drawer trays
- Tension rod for under-sink spray bottles
- Over-door rack for wraps and lids
- Adhesive hooks for inside cabinet doors
- Magazine holders or book bins
- Baskets in one color per shelf
- Small sink caddy or cake-stand soap station
- Small counter tray
FAQ
How much does a dollar store kitchen organization project cost?
It depends on how many spots you organize. Prices vary by store and item, so check the shelf tag for each item and add up your list before checkout. Organizing one shelf or one drawer with a few matching items costs little, and spreading the project across several weeks keeps the total easy to manage.
How do I make dollar store bins look less cheap?
Match the bins on each shelf, use one label style, and keep the color palette to two or three soft tones. Matching containers, matching labels, and a little space on each shelf help the look as much as any single container, and they add little to the cost.
Can I organize a rental kitchen with dollar store items?
Often, yes. Most ideas here are no-drill or freestanding, but adhesive hooks, tension rods, and over-door racks can still mark finishes, so follow each product’s instructions. For screw-in racks or rails, check the lease first and ask the landlord when the lease is unclear, so the change stays within the rental terms.
Are dollar store plastic bins safe for food?
Not every plastic bin is labeled food safe, so check the packaging. If a bin isn’t labeled, use it only for sealed, packaged items. Use jars with tight lids for loose dry goods, and keep cleaning supplies separate from food.
Conclusion
A dollar store kitchen looks good when the system behind it is simple: one spot at a time, items grouped by task, containers that match, labels in one style, and a little room left on each shelf. Start with the shelf or drawer that causes the most daily friction, measure it, and buy for that spot only.
Repeat the same style on the next shelf, and the kitchen starts to look like a room with a plan, not a room full of bargains. The containers cost little. The calm comes from the match, the labels, and the habit of putting each group back where it lives.